When it comes to Facebook ads, you really need their cousin Facebook Pixel on side. They watch over everything we do online. It gets stored in their huge memory bank for when it’s next needed. That way, if ever there’s a spot to advertise your content, Facebook Pixel will do just that.
What is Facebook Pixel?
Essentially Facebook Pixel is a piece of coding that you place on your website. It will collect data and insights that can help you track the people who visit your site. This might sound really intrusive, however, it’s actually just a handy tool to optimise your marketing strategies. Facebook Pixel will track conversions from Facebook adverts.
If you’re unsure of what conversions are, in an ecommerce sense, they’re essentially how a consumer has gone from an advert they’ve seen somewhere like Facebook, to then purchasing your products. Have you ever seen a product advertised while scrolling social media and thought that’s exactly what you’ve been looking for, so you buy it? Well, that would count as a conversion and would be used within Facebook Pixels data.
They also build up targeted audiences for your future adverts. Data will be collected of perhaps people who have similar interests to your typical audience, or people who have searched for similar products before. Adverts will then be prioritised to those individuals as they’re possibly more likely to be interested in your website. Anyone who has previously purchased from your site will be targeted by adverts too. This is because it’s arguably easier to get a repeat customer than pull a new one in.
What can Facebook Pixel track?
Facebook Pixel coding can track the following:
- Page views – the number of people visiting your site.
- Length of visit – how long people spend browsing your service.
- Adding to cart – the amount of people who add your product to their basket.
- Purchasing – how many complete the transaction.
Once added to your website, it will stay there and track visitors and how they interact with your webpages. This will give you the opportunity to retarget adverts at specific audiences. You can also track your Instagram campaigns through this feature
How does Facebook Pixel work?
It’s a little technical, but it all comes down to cookies. Unfortunately not the edible kind, but instead the ones that live on the web and track the things we do. Facebook Pixel places cookies to track your audience as they browse with your company on Facebook, Instagram and other websites.
Have you searched for a product before, browsed a website and maybe even added an item to your basket, but then not gone through with the purchase? Well, if so, you might have then seen the product appear as an advert at a later point. This could be on Facebook as you’re scrolling through, or perhaps you’re flicking through Instagram stories, and you notice the exact product pop up.
This angle is retargeting, and it’s a way for companies to remind their visitors what they have to offer. If you see it again after forgetting about it, you might take another look and decide to buy it. Facebook class various actions as events. These events consist of actions like adding something to your cart, even if you don’t go through with the purchase.
Facebook Pixel events
Below are examples of different events that can be tracked by Facebook Pixel:
- Purchase – a customer buying something from your website.
- Lead – somebody signing up for a trial.
- Complete registration – a website visitor registering their details to your website.
- Payment info – someone adding their payment information in the purchase stage.
- Add to cart – a potential customer adding an item to their basket.
- Add to wishlist – someone saving your products to a list for later.
- Initiate checkout – a customer starting to check out from your website.
- Search – the search tool within your site.
- View content – the page someone lands on when reaching your website.
- Contact – when someone gets in touch with your company.
- Customise product – someone selecting a colour or type of product from various options.
- Donate – if someone makes a donation to a cause.
- Find location – a visitor searching for your company’s location.
- Schedule – when an appointment is booked with your company.
- Subscribe – a paid product or service being subscribed to.
A breakdown of Facebook Pixel’s process
You first need to add the pixel to your website. This will be a process of adding a tracking code to your site. Then Facebook Pixel will begin its process of gathering insights. It will compile information such as your visitor’s location, what devices they use to access your site and any other information which might help build a picture of your audience.
The pixel will then start analysing how people interact, whether they just browse, click on and off again, or if they take more of an interest. If your visitors add a product to their basket or look into a specific product thoroughly, this will all be recorded. After this, an audience image will start to build. It will become more apparent what type of person is most likely to use your website.
How to install Facebook Pixel
To start with you’ll need to create your pixel. You can do this by heading to Facebook Events Manager>Connect a Data Source>Web. Then you’ll be able to select Facebook Pixel. Make sure you then name your pixel and add in your website URL. It’s important to be aware that your pixel is for your website rather than a specific campaign you’re looking to track. Choose to name your pixel something that works for your website overall.
Once your pixel has been created, you’ll next need to add it to your site. This is the more tricky part, and you’ll possibly need some assistance to do this. If your website is based on one of Facebook’s partners like WordPress or SquareSpace, you should use a partner integration. They’ll walk you through the steps you need to take to connect your Facebook Pixel, without needing to learn coding.
You might have a web developer or someone who knows everything about coding. If that’s the case, you can choose to email the instructions, and they’ll receive all the information they need to install your pixel. Both of these options will make everything much smoother for yourself. It takes out the headache that can come with anything involving codes.
What if you need to install it manually?
If you don’t have a tech wizard that can help you out, and you need to install the pixel yourself, we can help. We’ve put together some steps which should make the process easier for you.
- Press install code manually.
- Click the copy code button.
- Paste the pixel code into your website header code. Above the </head> tag. If you’re using a header template, post it there. If not, this code will need to be posted into every single page on your website.
- Once you have done this, click continue.
- Decide if you want to use automatic advanced matching. This will match customer data from your website to Facebook profiles. It will allow you to track conversions better.
- Press continue.
How to set up Pixel events
- Choose your Facebook Pixel ID.
- Click Settings.
- Open Event Setup Tool.
- Enter your website URL and press Open Website.
- Facebook will show a list of events. Review each one and either confirm or dismiss.
- Press Finish Setup.
Confirming Facebook Pixel is working on your website
You’ll want to check Facebook Pixel is working as soon as you launch it. Otherwise, you’re not going to gain anything from having it on your website. Use Facebook Pixel Helper to check everything through.
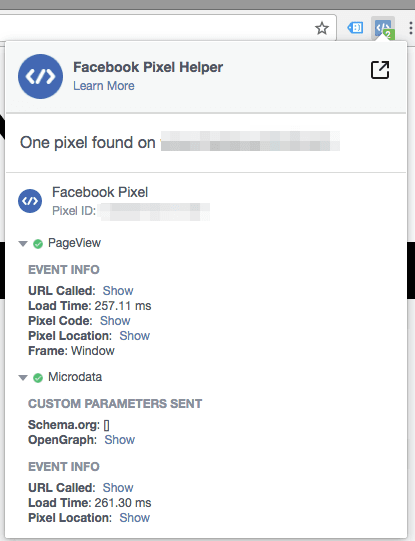
- Add Facebook Pixel Helper as an extension on Google Chrome. Please note, if you use any other browser, you won’t be able to use this extension, so you will first have to download Chrome.
- Visit your website, where Facebook Pixel is installed. You should see a pop-up which indicates how many pixels are on the page.
- If your pixel isn’t working correctly, you’ll be provided with error information, so you can fix this.
Add a Facebook Pixel notice onto your website
In order to follow Facebook’s terms you will need to ensure all visitors to your website know you are collecting their information. This is the law in some cases, so it’s important you follow this. If you’re going to collect data of visitors, you need to let them know.
The notice must be clear that you are using Facebook Pixel. Information that data might be collected through website cookies must clearly be stated. It is also required that you let users know how they can choose to not have their data collected.
 PUSH Tip: Please ensure you read Facebook Business Tools Terms and also Facebook’s Cookie Consent Resource. This will provide you with all the information you need to know about collecting users data.
Why use Facebook Pixel?
Facebook Pixel is one of the company’s many advertising features. It provides information that you can use to boost your sales and traffic. If you’re advertising beard care products, it’s unlikely your target audience will be young boys or women of any age. Something like that might be fairly obvious however when it comes to less transparent products and services it can be a little trickier to know where to focus your attention.
Of course, you’ll want to maximise custom, so you might try and target everyone. Perhaps you offer a product or service that people of any age or gender could try. You might run into the issue of spreading yourself too thin. For example, going back to the beard care. Yes, older men or boys in their late teenage years might use these products, however, they might not be the target audience for purchasing.
These sorts of products tend to find their way to them around Christmas time, and they’re usually bought for them by a loved one. While they might love your products, they might not be likely to be a customer, and therefore you’ll end up wasting time on advertising to them. Instead, you’d want to target men in their mid 20s+ as these are the sorts of ages where money becomes a bit more sustainable. They might then start to take more pride and care over their appearance because they’re in a position to do so.
Using Facebook Pixel means you can figure this out for your website. It will build an idea of exactly who your audience is. That way when you go to create adverts, you’ll be targeting the right people. It will avoid wasting time and money on adverts that flop. Instead, you should start to see a better turn around the more you look at your insights.
